Basics of Git for Visual Studio TFVC users
This is just a small intro into the basics of Git using VSTS and Visual Studio. This is not a catch-all about git.


This is just a small intro into the basics of Git using VSTS and Visual Studio. This is not a catch-all about git.
Disclaimer
Just so you know I am no expert in advanced git subjects. I have just been using Git for fairly short time. But for this article I have done my share of research so I know more now than before.
My (bad) history with Git
I have been using TFVC (mostly in TFS and then VSTS) for around 11-12 years. And I kinda liked it... it was at least way better than SourceSafe.
In 2013 I was creating an iOS mobile app, using XCode and a Mac. I remember trying to find a way to use TFVC but without luck.
So I decided to use Git.
And oh boy! Did I not like it at all!
I had the knack to mess the repo up so much I just had to delete everything and start again fresh.
At that time I had nobody to teach me and I did give my self enough time to the research needed to be proficient in git command line. I was after all coding in Objective-C in a Mac... did I really need to increase the learning curve?
Yes and I did not use any GUI tool at that time.
Fast forward to my (good) history with Git
Last Christmas my team had sold me the idea to move to git. So we just made the jump and started to move our code to Git.
And boy... I loved it!
But lets brake it all down in smaller chunks.
Because there is a small learning curve to git.
Where to begin?
I have tried to order the items I think you need to know in right order. So the cough..cough...best place to start is probably just next,next, next.. in this blog entry.
Terminology
When you get hang of the terminology in git and how it matched up with TFVC everything gets much easier.
Here is a list of the basics. There are lots of others (rebase/cherrypicking/reset/etc) that you should not concern your self to much with at the moment if you are just getting into using git.
Here is a list of comparison of TFVC and Git actions terminology that should help you familiarizing yourself with git (when coming from TFVC).
| TFS Version Control (TFVC) | Git Actions |
|---|---|
| Workspace | Repository (aka. “Repo”) |
| Switch workspace / branch | Checkout |
| Get Latest (First time) | Clone |
| Get Latest (After first time) | Pull |
| Check in | Commit + Push |
| CheckIn and Get Latest Version | Sync (Push and Pull. Only exists in VS GUI) |
| Check out | (just start typing) |
| Branch | Branch |
| Merge | Merge |
| Code Review | Pull Request (PR) |
| Shelveset | Stash |
| Label | Tag |
| Exclude | !Stage |
Looking at this from the Git side
| Git Actions | TFS Version Control (TFVC) |
|---|---|
| Repository (aka. "Repo") | Workspace |
| Checkout | Switch workspace / branch |
| Clone | Get Latest (First time) |
| Pull | Get Latest (After first time) |
| Stash | Shelveset |
| Commit | CheckIn / Shelve code to local branch/repo |
| Commit + Push | Check in to central (cloud) repo |
| Sync (Push and Pull. Only exists in VS GUI) | CheckIn and Get Latest Version |
| (just start typing) | Check out |
| Branch | Branch |
| Merge | Merge |
| Pull Request (PR) | Ask for Code Review |
| Tag | Label |
| Stage | !Exclude |
When I had finally mapped Git onto TFVC it all clicked!
So what is the difference between Git and TFVC?
You often hear the following
Git is a distributed version control and TFVC is a centralized one
Like the text behind the links in that statement says
Git is a distributed version control system. Each developer has a copy of the source repository on their dev machine. Developers can commit each set of changes on to their dev (local) machine and perform version control operations such as history and compare without a network connection. Branches are lightweight. When you need to switch contexts, you can create a private local branch. You can quickly switch from one branch to another to pivot among different variations of your codebase. Later, you can merge, publish, or dispose of the branch.
Team Foundation Version Control (TFVC) is a centralized version control system. Typically, team members have only one version of each file on their dev machines. Historical data is maintained only on the server. Branches are path-based and created on the server.
What do I personally like about using Git?
-
Lightweight creation of branches.
I can easily create a branch locally to explore something and then if I want to share that with somebody else I can push it to the server to share with somebody else in my team without braking anything and then either decide to pull it all into the main branch (or better cherry-pick parts of it into the main branch). -
Having visual history for the branches and commits
- Powerful branching strategy. If done right, it will make your release cycle much more transparent and stable.
- According to the 2018 Stack Overflow developer survey, more than 70 percent of developers use Git, making it the most-used VCS in the world.
- But don't take my word for this all an read over these 7 advantages of git compared to other source control systems and Choosing the right version control for your project
Better merge. 3-way merge insted of 2-way
In computer science there is something called k-way merge algorithms. And git has a higher k value than TFVC (1 higher).
Git has a 3-way merge and a TFVC 2-way one.
But what are 2 and 3-way merge and why does it matter?
2-way merge (TFVC)
It doesn't consider the base file (also known as the common ancestor) for the merge.
Here the compare is only done on two possibly changed files. The merge does not know about how the file used to look like.
3-way merge (git)
3-way merge gives you the ability to know whether or not a chunk is a change from the origin and whether or not changes conflict.
Scenario example
So lets say you make a change to the bottom of a file and a coworker has done change to the same file at the top.
Then you need to push your changes, but first you need to pull his changes to your repository and merge his changes to yours.
With 2-way merge the tool will tell you that there is a merge conflict (in the file somewhere) and you need to manually choose what to keep and what to drop.
In a 3-way merge the tool has information about how the file looked before there was a change and can auto merge the files for you because there was no real conflict.
I tried to keep the explanations as simple as possible. But if you like more information on Three-way merging I would reqcomend you take a look at this article Three-Way Merging: A Look Under the Hood.
OK now you have a git repo in VSTS. Whats next?
I'm going to assume you have got your git repo down on your computer from VSTS. If not you can use this guide to do that.
Try the most basic command line commands first
Even though you plan on using just GUI for Git, you really should try out the most basic command line commands.
Navigate to your repo in command line and just run the following commands
git loggit log --author=sturlagit log --onelinegit log --pretty=onelinegit log --format=fullergit log --graph --oneline --decorate --allASCII art tree of all the branches, decorated with the names of tags and branchesgit statusgit pull
log shows the commit logs for the branch. --online gives you just the first 7 in the commit hash and the comments. More on log here.
status will show you any changes you have done. If there are none just add space to a file and run it again.
pull to get your local repository up to date with the newest code bits.
Now that you have touched git in a command line, we will take a look at Visual Studio Git GUI. Later on I would recoment that you come back here and take a look at this list of git commands for everyday git usage broken down after the role of the developer.
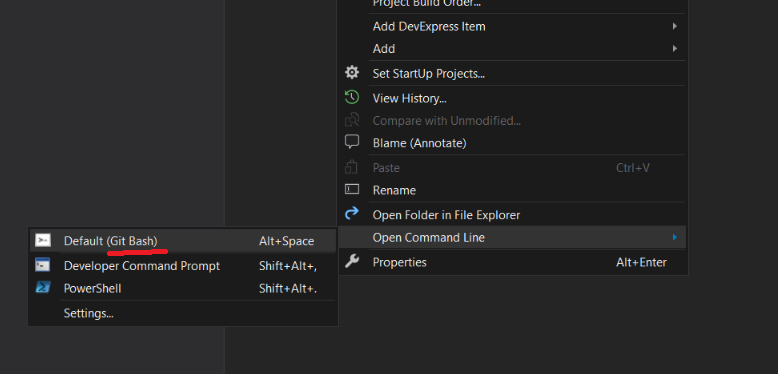
If you get stuck in git you can easily exit by pressing q.
You can also use the VS extension Open Command Line and change the default command line to use Git bash.
Visual Studio Git GUI
You can work with Git in the command line and some state that is the only way. But you can also use GUI clients both third party to VS or just use VS.
Lets look at working with git in VS. What are the steps?
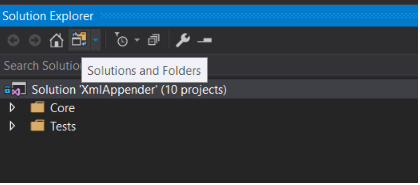
Solution Explorer
When you open up a Git solution in VS it opens up in a folder mode.
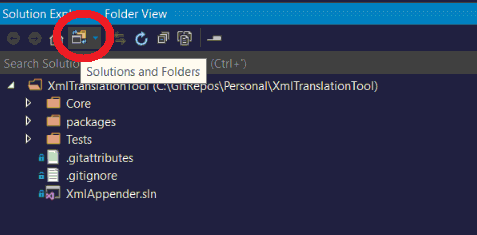
Just press the "Solution and folders" button and your are in.
.gitignore
You can easily choose what files you do not want to push to VSTS by using the .gitignore file that is automatically create when you create a new repository in Visual Studio.
Team Explorer Home
The Git Team Explorer contains just few things.
- Changes is a list of your local changes ready to be committed/stashed
- Branches is a list of your local and central branches
- Sync is a list of commits ready to be synced to central branch.
- Tag is window to get a (tagged) version or to tag one.
- Pull Request (PR) Generate a request asking your upstream project to pull changes into their tree. Its usually used for a code review.

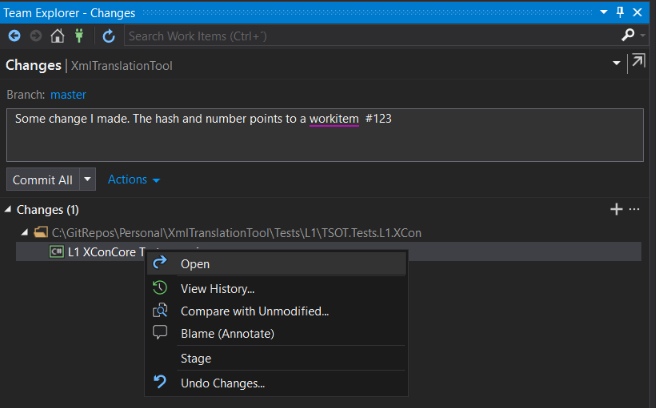
Changes
Here you commit your changes to the code. Here you have some options.
- Press Commit All and commit to master locally.
- Press the arrow next to "Commit All" and get the following options
- Commit All and Push that commits and pushes changes to VSTS
- Commit All and Sync commits,pulls and puses changes to VSTS
- Stage. Invert of TFVC exclude. What is Staged will be committed together.
- Hash tag (#) in commit text links the commit to a work item.
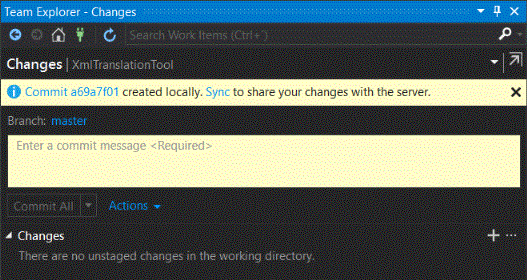
If you press "Commit All" you get the following where you can press Sync
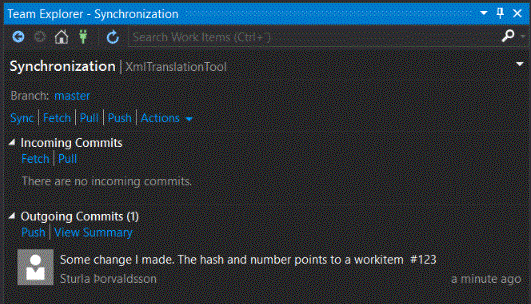
Pushing the code to VSTS
After pressing the Sync in the previous window you are taken to a place where you can push your code centrally to VSTS.
Here we have few options.
- Sync pulls and pushes your changes to VSTS in one command.
- Fetch just checks what incoming changes there are. Does not pull them down into your repo.
- Pull get and merge any changes from VSTS into your branch.
- Push push your changes to VSTS. Note that if there are incoming changes you will need to get them first (and resolve any conflict there might be) before you can push.
Undo (reset/revert)
Like explained in undo changes there are two types of undo.
Revert
Use revert to undo the changes made in your commits pushed to shared branches. The revert command creates a new commit that undoes the changes on a previous commit. No history is rewritten in a revert, making it safe to use when working with others.
Reset
Use reset to bring a branch in your local repository back to the contents of a previous commit.
Note that you can use reset --hard to clear all local commits. More on that in the advanced section below.
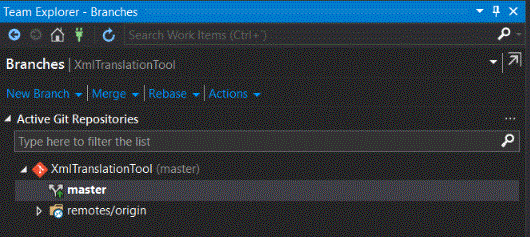
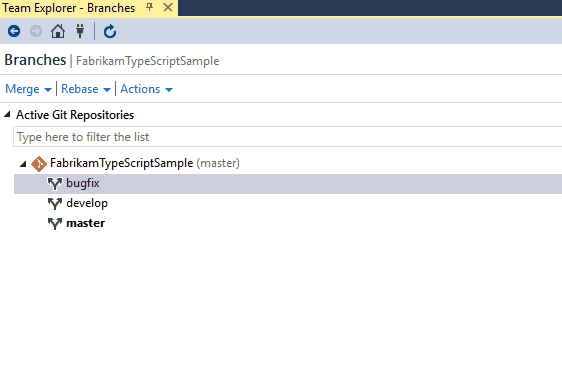
Branches
Here you can view both local and remote branches. What you see under remotes/origin are the branches that are centralized in the cloud. All others are your local branches.
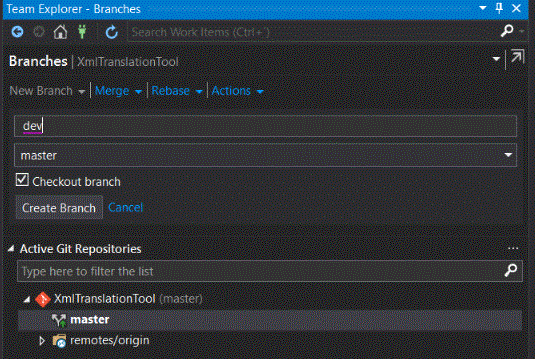
Lets create a dev branch.
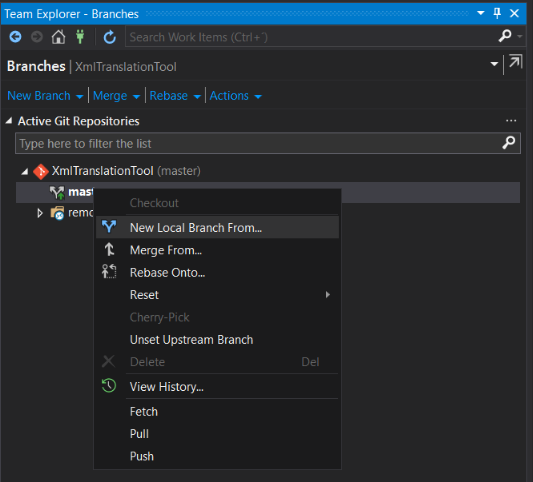
dev will be based on master
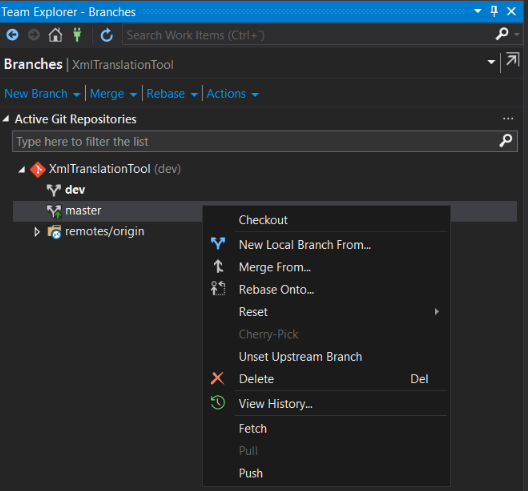
Now that we have created the dev branch based on master, it will be the active one (bold) so we get different options on the master branch.
- Checkout switch to this branch. You can also just double click the branch.
- Delete note that you can't delete the branch that is checked out/active.
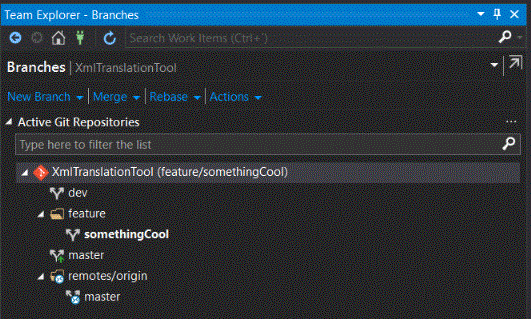
Feature branches
Create a folder for your features. Lets say you have many branches where you are exploring something in code you don't want to mix into longer living branches or it is a feature branch.
Then you should create a branch folder by using / in the name of the new branch.
Just like this
feature/somethingCool
or
sturlasTests/ForRobertToCheckOutWithMe
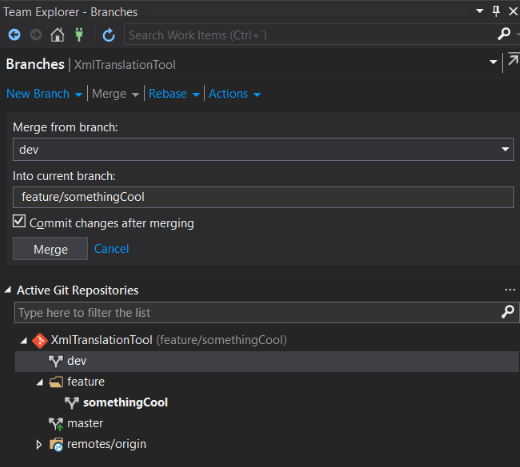
Merge
Now lets say that you have been working on a branch and you like to merge your changes in to another branch you can do that by merging (and later by pull request).
Cherry-pick
If you want to take a commit from another branch and add it to the branch your are on you do the following.
- View history on the branch you are going to take the commit from (to add to your own)
- Right select the commit you want and then choose cherry-pick
- If there is a conflict with your branch you just merge it.
- Then select the Sync window and push the changes.
Cherry-pics is a greate way to tackle the following common problems
- Accidentally committing on the wrong branch. Cherry-pick the change(s) over to the correct branch and then reset the original branch to the previous commit.
- Pulling out a set of commits made in a feature branch so you merge them back to your master branch sooner.
- Porting in specific commits from the master branch without rebasing your branch.
PR (Pull Request/Code Review)
Pull request is basically asking somebody else to pull your code into the repository after he/she has given the changes the thumbs up (code reviewed it).
Main branches (like master) should be closed for direct pushing and only accept PR's. That is of course just settings issue and my personal opinion.
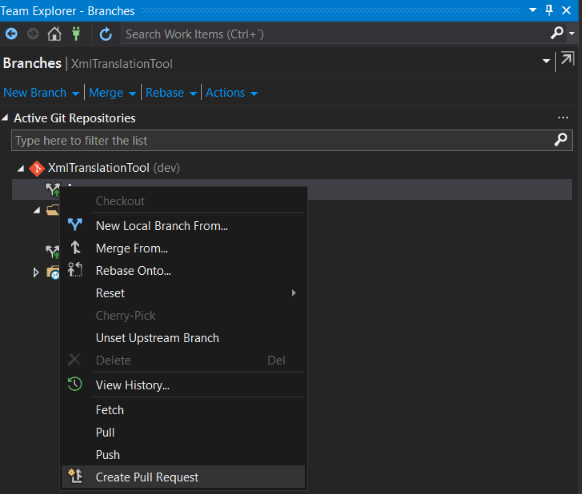
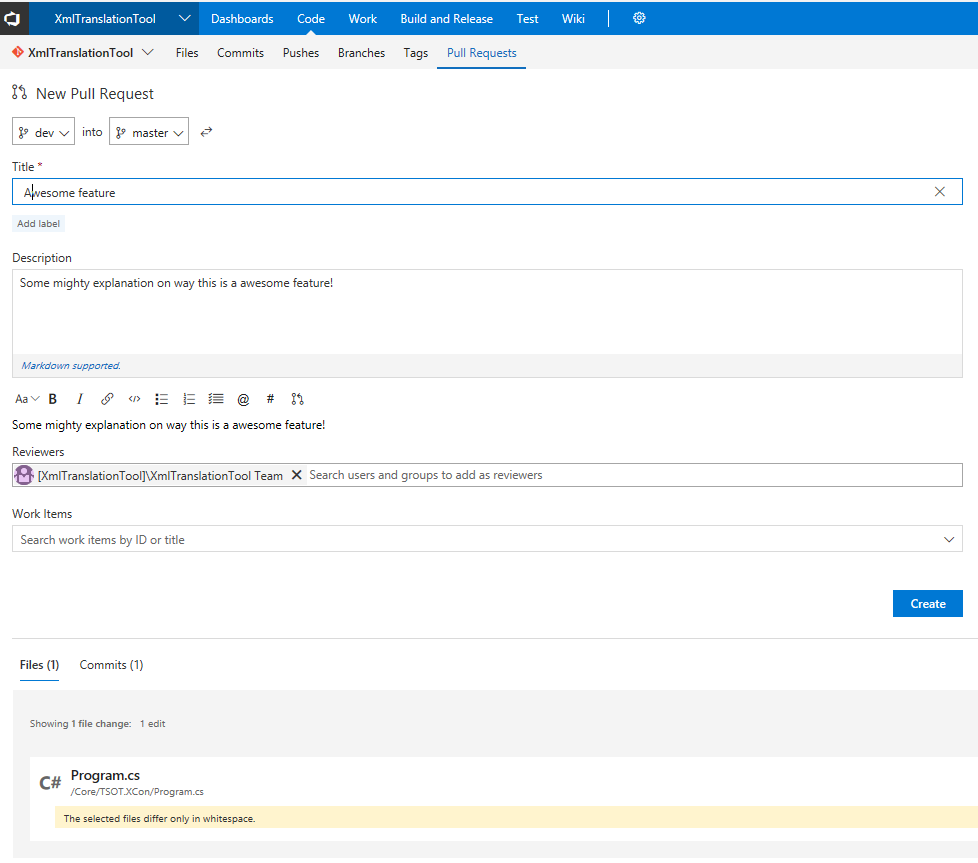
Clicking on the Create Pull Request option will take you to VSTS where you create the pull request to another branch.
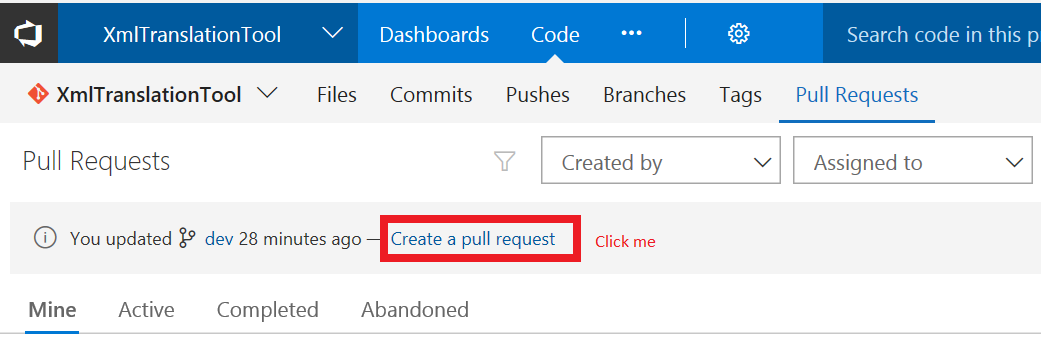
which will take you to this screen
Git best practices
Git Tower has a list of best practices that you should get yourself familiar with because it will make your git life easier.
- Commit related changes
- Commit often
- Don't commit half-done work
- Test Code before you commit
- Write good commit messages
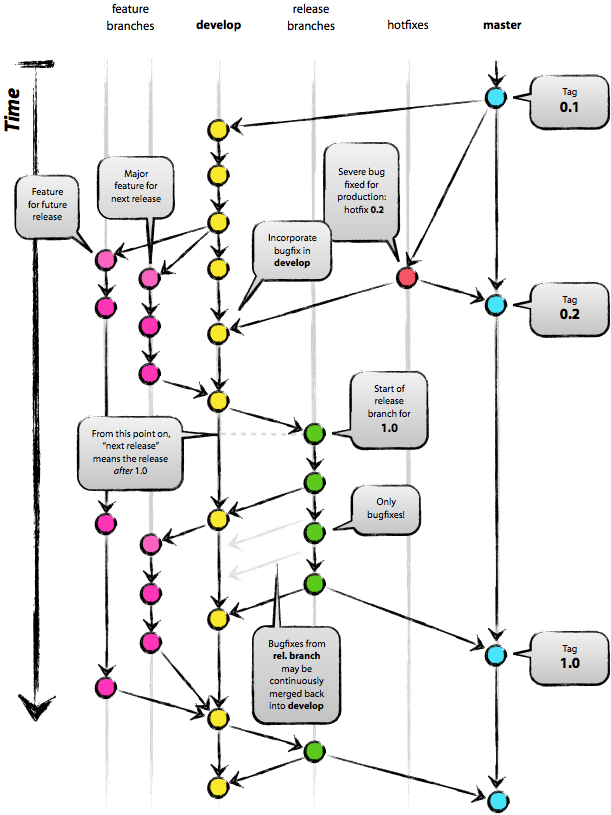
- Use branches. Take a look at A successful Git branching model
- Version Control is not a backup system
- Agree on a workflow
GitFlow
It is possible to make git very easy to use by using GitFlow.
GitFlow is a list of rules to keep a repo's history organized, and is used to make the release process, bug fixes, and feature creation easier. It has attracted a lot of attention because it is very well suited to collaboration and scaling the development team.
Please take a look at this short video on GitFlow
Third party GUI tools
There are lots of visual git tools out there you can use in junction with Visual Studio. The tree I have looked at are the following.
- GitKraken
- GitTower
- GitHub Desktop (free)
- SourceTree (free)
I personally have the most experience with GitKraken. But the best thing is that not everybody has to use the same one.
More command line commands
Nothing super advanced here. Just some "backed yourself into a corner" stuff I personally have found useful.
"Undo" local commit
If you have already committed your code locally and you want to delete the commands (instead of reverting them you can use the following. Reset will erases your git history instead of making a new commit.
NOTE the following command will delete ALL local commits!
git reset --hard origin/master
"Undo" branch commit
Lets say you want to undo a commit that has been pushed to a branch. It could be the last commit or the tenth last one. Then you use revert that will create a commit (that is the opposite of an existing commit) that you then need to check into the repository.
The revert will be a part of the version history. You can't just delete the last checkin (at least I don't think so)
git revert <insert bad commit hash here>
And then commit/push your update.
And then there is this excellent list of more advanced git commands that you should look at.
Other resources
There are lots of information on Git out there. Here are few good
- Git cheat sheet from Git Tower.
- Workflow cheat sheet
- git - the simple guide
- GitHowto
- Learn git branching interactively
- Online interactive git repo to play with
- Pro Git book
- Git Extras - repo summary, repl, changelog population, author commit percentages and more.
This should be enough to get you started using Git. There are lots of other stuff you will probably learn later but with this you are quite good at the moment.
I hope you learned something by reading this. If you did/didn't contact me at twitter and tell me about it.