30. January 2020
Font images in Xamarin.Forms
There have been few articles written already on this subject. But every time I create a new solution and need to read about how to add font images it takes me few hours to figure it out and implement.
But first things first, since I’m standing on the shoulders of giants I would like to point out the articles I’m trying to make clearer
- Using Font Icons in Xamarin.Forms: Goodbye Images, Hello Fonts! by James Montemagno
- Xamarin.Forms: Custom Fonts with Android, macOS and WPF
- Using FontAwesome 5 in Xamarin Forms
- Creating a clean Style Library for Xamarin.Forms v1.0 I recommend that you read this one because of how it talks about arranging your stiles.
#So here is my version!
##Step 1 Install the Material Design Icons by downloading them from here (blue download button).
You can also go to IcoMoon or FontAwesome and download a free (or Premium) packs that contain a *.ttf file. There are probably lots of places out there where you can get these files.
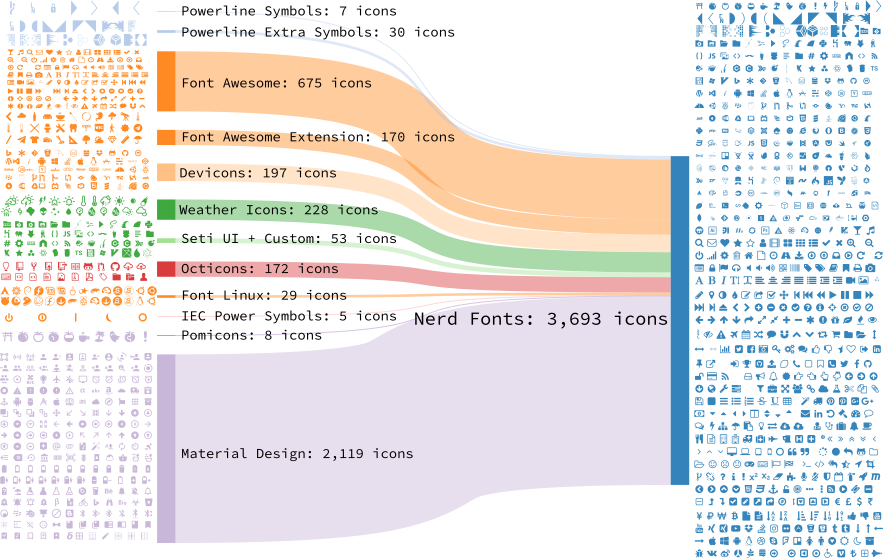
##Update: Get your fonts from here! 4951 font glyps as of writing! I just descovered NerdFonts where you get aggregated fonts from all the popular sources, Font Awesome, Devicons, Octicons, and others.

##Step 2 Open the zip file and find the materialdesignicons-webfont.ttf file and do the following for each platform
- On Android add the file to the Assets folder and make sure it is marked as an AndroidAsset
- On iOS add the file with Build Action: BundleResource, and update the Info.plist file (see below)
- On UWP add the file to /Assets/Fonts/ and make sure it is marked as Content
##Step 3 Update the Info.plist for iOS with this
<key>UIAppFonts</key>
<array>
<string>materialdesignicons-webfont.ttf</string>
</array>
##Step 4 Now you need have access to the fonts (in the *.ttf file) in your XAML code. Take a look at James’s blogpost on C# access.
Go to IconFont2Code and upload your *.ttf file.
![]()
Copy the C# code they create for you and create a IconFont.cs file in your Xamarin.Forms project under Styles (your choice of course).
##Step 5 Add this code to App.xaml
<ResourceDictionary>
    <OnPlatform x:Key="MaterialIconFont" x:TypeArguments="x:String">
      <On Platform="iOS" Value="Material Design Icons" />
      <On Platform="Android" Value="materialdesignicons-webfont.ttf#Material Design Icons" />
      <On Platform="UWP" Value="Assets/Fonts/materialdesignicons-webfont.ttf#Material Design Icons" />
    </OnPlatform>
</ResourceDictionary>
Note that you can also wrap this code with <ContentPage.Resources>code above here</ContentPage.Resources> and add it to your individual pages.
##Step 6 Now you can use the following Label and Button on your pages
<Label Text="{x:Static MaterialIconFont:IconFont.Cart }" FontFamily="{StaticResource MaterialIconFont}"  FontSize="50" TextColor="Red"/>

<Button Text="{x:Static MaterialIconFont:IconFont.Cart }" FontFamily="{StaticResource MaterialIconFont}"  FontSize="50" TextColor="Red"/>
You can also just add the following into the ResourceDictionary.
<!--In IconFont.cs the Cart has this value "\uf110". Just swap out \u with &#x-->
<x:String x:Key="Cart"></x:String>
And then have direct access to it, through the Cart key, like this
<Button Text="{StaticResource Cart}" FontFamily="{StaticResource MaterialIconFont}" FontSize="50" TextColor="Red"/>
It is also possible to add the following code to the ResourceDictionary
<FontImageSource
                x:Key="icon_cart"
                FontFamily="{StaticResource MaterialIconFont}"
                Color="Red"
                Size="30"
                Glyph="{x:Static MaterialIconFont:IconFont.Cart }"/>
and use it like
<Button ImageSource="{StaticResource icon_cart}" FontFamily="{StaticResource MaterialIconFont}" />
And if you want to add an image to the toolbar you can do it like this
    <ContentPage.ToolbarItems>
        <ToolbarItem>
            <ToolbarItem.IconImageSource>
                <FontImageSource
                    FontFamily="{StaticResource MaterialIconFont}"
                    Size="30"
                    Glyph="{x:Static MaterialIconFont:IconFont.Cart}"
                    Color="Red" />
            </ToolbarItem.IconImageSource>
        </ToolbarItem>
    </ContentPage.ToolbarItems>
Databinding a Glyph
Yes you can also just databind your icons based on some logic you have.
 <Image >
    <Image.Source>
        <FontImageSource
            FontFamily="{StaticResource MaterialIconFont}"
            Size="30"
            Glyph="{Binding GlyphIcon}"
            Color="#101010" />
    </Image.Source>
 </Image>
and then this in your C#
GlyphIcon = IconFont.Cart;
Easy?
There are probably few other ways to do this but this is enough for now. I will be setting up my styles somewhat like Creating a clean Style Library for Xamarin.Forms v1.0 but there he is using Shell so when I have found out how I want to have mine setup I’ll update this blog-post. Or write another one… who knows…
Please hit me up on Twitter if I’m missing something and I’ll try to augment it.